
My first summer in San Francisco, I bought a little Weber and installed it on my fire escape. Within two minutes of lighting its inaugural pile of charcoal, I answered my doorbell to find an irate neighbor pointing at the flames and reminding me that all the houses in our neighborhood were constructed of wood. My poor Smokey Joe was instantly retired. Since then, I’ve explored various safer ways to char my food and finally, after quite a few years, settled on a system that actually works.
After dismissing stovetop options, such as grill pans and an aluminum rack on legs that I dug up in the back aisle of Soko Hardware, I finally cobbled together a simple setup.
I had a gas stove from the 80s with a broiler drawer at the bottom. (It was pristine the first time I opened it; the previous inhabitants hadn’t used it once!) Unfortunately, I could never get enough heat to sear and finish food with that unique texture and flavor that comes from the direct heat of a hot, dry flame. Everything steamed and soaked in its own juices, and my food always left a mess that was a pain to scrub away.
Two things changed that:
1) Replacing the wimpy grill pan that came with the stove. I bought the biggest, heaviest searing grill that I could find. The ones that stretch across two burners and have a grease well are perfect. I splurged on a Dacor searing grill, but there are plenty others that will work.
2) Following Linda Carucci’s advice and keeping the door of the broiler open an inch or so. This helps the steam escape to maintain dry heat.

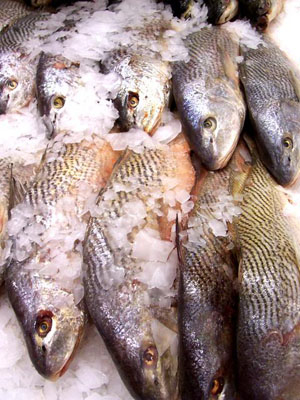
As you can see from the photo, even whole fish grills up crisp and clean. It’s essential to preheat the searing grill until smoking hot. The first few times you use it, be sure to brush it lightly with peanut or grapeseed oil (you’ll need the high-smoke point!). As the grill becomes seasoned though, the oil in the marinades and moist rubs is enough to lift food off easily. I can now confidently follow summer recipes throughout the year while keeping my fire escape free of flames.
For the other half of grilling fish in the city, here’s a quick primer on buying the freshest fish possible…
FINDING A FISHMONGER
Visit a quality fishmonger. New May Wah on Clement and 8th Ave, Bryan’s on California St., Shogun Fish at the Ferry Plaza Farmers Market, Berkeley Bowl, 99 Ranch and Whole Foods are a few of the places I’d recommend, but the best thing to do is look for a good store near you and then cultivate a relationship with the folks behind the counter.
Ask friendly questions, such as their advice about the freshest fish of the day, how it was caught and how they like to prepare it. After a few visits, you’ll figure out if they know what they’re talking about. Best of all, you’ll become one of those favorite regulars who receive the best of the counter. Any quality vendor appreciates curious customers who are looking for good products. (Be prepared for brusque service at the Asian fish counters, though. I hate to admit it, but customer service isn’t their forte. Super-fresh fish for the fearless, on the other hand, they have covered.)
When you walk into a new place, look for lots of ice for the whole fish and metal trays for the fillets and steaks. Needless to say, you should immediately leave any place that smells of rotten fish. A wall of tanks filled with lively fish swimming in clear, bubbling water is at the top of my own list, since I often point at the exact fish I want netted. Little signs that indicate origin and the method of catching are helpful for those who are trying to eat within a sustainable seafood system.
SELECTING FISH
On whole fish, don’t be afraid to lift the gills to check for red blood. Avoid any fish with dry, browned gills. Then press your forefinger into the thickest part of the fish’s flank to watch its flesh spring back out, quick and firm. Wet, moist tail and fins are good; dry, brittle ones are bad. Clear, shiny, rounded eyes are another good indicator of fresh fish, although sometimes the ice can damage them, so it shouldn’t be the only thing on your list. Sniff for an odor of ocean. It’s okay to get a noseful of “pier perfume,†but there should be no hint of decay or any strong “fishiness†that reveals too many days out of the water.
If you’re buying fillets, the touch and smell tests are the best. Even cut flesh will spring back. You shouldn’t be able to see a depression where your finger was. The longer your fingerprint lingers, the older the fish. Sliminess is another sure sign that you should move on to the next fish or choose chicken for dinner. Whole fish will have a natural shine and slipperiness — the scales dull and loosen as the fish ages out of water — but cut flesh should not feel slick.
If the fish is protected behind glass cases, I make a point of asking the person helping me to poke the fish for me or to bring it out so I can perform my own touch and sniff tests. No, I don’t mind people behind me sighing, rolling their eyes or muttering under their breaths.
Sometimes, though, the best fish is in the freezer. A fish that’s expertly frozen within hours of leaving its watery home is much, much better in quality than a so-called fresh fish that’s taken almost a week to get from boat to market.
After going through all that trouble tracking down and identifying a good fish, don’t bother waiting a couple of days to cook it. Plan on buying, cooking and eating your fish the same day or, at the most, within a day of finding it.

PREPARING WHOLE FISH FOR THE GRILL OR BROILER
Here are some tips for handling whole fish:
If you’re not comfortable gutting and scaling a whole fish (that’s another whole entry in itself…) then make it easy on yourself and ask the fishmonger to clean the fish for you. What you want is simply a dressed fish: gutted and scaled but with its head, fins and tail intact.
Get back home quickly, or plan to bring a cooler or insulated bag with you. I often ask the fishmonger to put the fish, after weighing it, into another bag with some ice. No market has ever refused to do this, and they may have a ice pack or two that they’re happy to pass along.
When you unwrap the fish in your own kitchen, take care with the tail and fins. They sometimes have sharp ends that can poke or cut your hand.
With any fish that’s more than two inches thick, cut three slits at an angle into each side of the fish to allow the heat to penetrate to the center. I like to fill the belly cavity with aromatics — say scallions and lemon slices or big handfuls of fennel fronds — in order to maintain its rounded shape at the table. A few toothpicks soaked in water will keep the belly flaps together.
Here’s an old trick for creating a “nonstick†grill rack: Cut a big, starchy potato in half. Stick the potato halves onto a big fork. Be sure the grill rack is clean and free of burnt food remains. Once the preheated grill rack is hot, rub it well with the cut side of the potato halves. The instantly seared layer of starch will create a surface which will release the fish more readily, especially if you have a brand-new, shiny grill.
For every inch of thickness, allow ten minutes to cook the fish. It will vary slightly either way, but this is a good baseline for figuring out cooking times. Once the fish flakes easily close to the bone, it’s ready for eating. I prefer undercooking to any amount of overcooking, but you should cook the fish to the point that you enjoy. With the variation in size and species, the best way to test for flake is with the tip of a paring knife.
Use two wide spatulas to roll the fish gently when it’s ready to turn. Be sure there are enough hot coals beneath the area where the second side will cook. Brush the fish lightly with oil before turning it.
Wrapping a fish in soaked banana leaves will make the fish easier to turn and remove. You’ll lose that nice char but will gain a wonderful smoky flavor while retaining lots of moisture. Plan for a longer cooking time.
If you have a pizza peel or one of those thin cookie sheets, especially one with a tapered edge, then you can scoop up the whole fish with little effort. Otherwise, use those two wide spatulas and have the platter as close to the fish as possible.

SPICY GINGER-LEMONGRASS RUB
This is a recipe that I’ve adapted from my uncles in Vietnam. Whenever I visited, they’d chop down a young banana tree to create an impromptu grill. Two logs of the juicy trunk supported split bamboo skewers, and everything from the family chicken to sweet field mice ended up coated with this spicy, savory rub.
I have an Indian-style mixie which makes it a lot easier to blend the hard lemongrass with minimal liquid. If you have a regular blender, plan on chopping the ingredients more finely and then adding a bit more oil and/or wine to help the blades do their thing.
Chop roughly:
A big knob of ginger, peeled
The pale half of 4 stalks of lemon grass
3 large cloves of moist, plump garlic
2-4 red Thai chiles, seeded or not as you wish
A small knob of fresh turmeric (or a half teaspoon of powdered turmeric)
Have ready 3-4 tablespoons each:
Shaoxing rice wine or dry sherry
Vegetable oil
Combine the aromatic, dry ingredients in the jar of a blender. Drizzle in 2 tablespoons of the rice wine and oil. Blend to a smooth paste, adding more liquid and scraping down as needed. Rub evenly onto fish, chicken, beef, pork or pressed tofu. Cover and let marinate in the refrigerator overnight.
Grill or broil the meat or tofu with high, direct heat, brushing lightly with additional oil.